
Introduction
Every time I think of Dishoom Basmati Kheer Recipe 2026, I remember my first spoonful at Dishoom. It wasn’t just a dessert recipe—it was an experience!
» The creaminess of slow-cooked basmati rice, the aroma of saffron, and that crunch from pistachios… honestly, it transported me back to my grandmother’s kitchen where she made kheer during festivals.
» As a chef, I love how this recipe balances tradition and luxury. It’s humble rice and milk, elevated with cardamom, saffron, and rose water.
And the best part? You can recreate the Dishoom magic at home with just a few pantry ingredients. Ready to make this iconic dessert with me?
Let’s get cooking!
What is Dishoom Basmati Kheer?
» Dishoom’s Basmati Kheer is their modern take on India’s most loved dessert—kheer (rice pudding). Made with fragrant basmati rice, simmered in milk, and infused with saffron and cardamom, this kheer is thicker, creamier, and richer than most versions.
» Unlike regular kheer, the Dishoom style is luxurious and aromatic, often garnished with nuts, raisins, and a hint of rose.
Why You’ll Love This Kheer Recipe
» You’ll love this Dishoom Basmati Kheer Recipe because it combines authentic flavours of saffron, cardamom, and basmati rice with a creamy, slow-cooked texture that feels indulgent yet comforting. It’s versatile enough to be served warm in winter or chilled in summer, making it a year-round favourite.
» Whether you’re hosting a festive gathering or simply craving a cosy dessert, this kheer stands out with its elegance and simplicity. Plus, it’s customizable—you can make it vegan, adjust sweetness, or play with garnishes to perfectly suit your taste.
Kitchen Equipment For Dishoom Basmati Rice Kheer Recipe
» Heavy-bottomed saucepan (to prevent milk from sticking)
» Wooden spoon or spatula
» Small bowl (for saffron infusion)
» Measuring cups & spoons
» Serving bowls or clay pots (for authentic presentation)
Ingredients for Dishoom Basmati Kheer Recipe 2026
Here’s what you’ll need:
» Basmati rice – ½ cup, rinsed & soaked
»Full-fat Milk – 1 litre
» Sugar – ½ cup (adjust to taste)
» Green cardamom pods – 4–5, crushed
» Ghee – 1 tbsp (optional, for richness)
» Rose water – ½ tsp (optional, for aroma)
» Saffron strands – soaked in 2 tbsp warm milk
» Garnishes – almonds, pistachios, cashews & raisins
Recipes You May Also Like!
» Golden Corral Meatloaf Recipe
» Crispy Dragon Shrimp Red Lobster Recipe
» Yard House Chicken Lettuce Wraps Recipe
Dishoom Basmati Kheer Recipe Instruction 2026

Here’s a detailed, step-by-step instruction for your Dishoom Basmati Kheer Recipe 2026:
Step 1: Rinse & Soak the Rice
♥ Measure ½ cup of basmati rice.
♥ Rinse it under cold water 3–4 times until the water runs clear (this removes excess starch so the kheer doesn’t get sticky).
♥ Soak the rice in fresh water for at least 20 minutes. Drain before use.
Step 2: Heat the Milk
♥ In a heavy-bottomed saucepan (to prevent burning), pour 1 litre of full-fat whole milk.
♥ Now, you need to boil on a medium flame. Stir occasionally to prevent sticking at the bottom.
Step 3: Add the Rice
♥ Add the drained rice to the hot milk.
♥ Stir gently to distribute the grains evenly.
♥ Lower the heat to a gentle simmer. This slow cooking helps the rice absorb the milk.
Step 3: Infuse with Flavour
♥ Crush 4–5 cardamom pods and add them to the mixture.
♥ Soak a few strands of saffron in 2 tbsp warm milk and pour it in. This gives your kheer its golden hue and signature aroma.
Step 4: Simmer Slowly
♥ Continue cooking the rice in milk for 35–40 minutes, stirring every few minutes.
♥ Scrape down the sides of the pan to mix in the thickened milk layers (this adds richness).
♥ The rice should soften completely, and the milk should reduce to a creamy consistency.
Step 4: Sweeten the Kheer
♥ Add ½ cup sugar (or adjust to taste).
♥ Stir until fully dissolved. Let it simmer for another 5 minutes so the sweetness blends into the milk.
Step 5: Optional Richness
♥ Stir in 1 tbsp ghee for a silkier mouthfeel.
♥ Add ½ tsp rose water for an aromatic Dishoom-style finish (optional, but recommended).
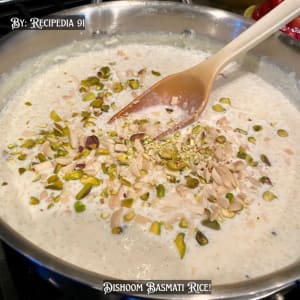
Step 6: Garnish, Serve and Enjoy!
♥ Remove from heat once the kheer is thick and creamy.
♥ You can garnish this kheer with some chopped almonds, pistachios, cashews, & raisins.
♥ Serve warm in clay pots for an authentic Indian experience, or chill in the fridge for a refreshing summer dessert.
Pro Chef’s Note:
The kheer will thicken further as it cools. If it becomes too thick, stir in a little warm milk before serving to adjust the consistency.
Ingredient Substitutes For Dishoom Kheer Recipe
| 🥥 Ingredient Substitutes | ||
|---|---|---|
| Ingredient | Substitute | Notes |
| Whole milk | Almond or coconut milk | Vegan option |
| Sugar | Jaggery or stevia | Natural/sugar-free |
| Basmati rice | Brown rice or quinoa | Healthier base |
| Nuts | Pumpkin or sunflower seeds | Nut-free alternative |
| Ghee | Coconut oil | Vegan richness |
Can I use condensed milk?
Yes! It makes the kheer thicker and richer while reducing cooking time.
Tips for the Perfect Dishoom Basmati Kheer Recipe
Use Full-Fat Milk
» First, you need to use Full-Fat milk for the creamy texture of the kheer. Whole milk (or even a mix of milk + cream) gives the best results.
Cook Low & Slow
» Patience is key! Simmer it gently for at least 35–40 minutes on a low flame
Soak the Rice First
» You need to soak the rice for at least 20–25 minutes for a smooth & soft texture of the kheer.
Infuse Aromatics
» First of all, you need to soak saffron in the warm milk. This helps release its golden colour and aroma more effectively.
Stir Frequently
» Scrape the sides of the pan while stirring—those thickened milk solids are flavour bombs that make the kheer rich.
Add Sugar Later
» Wait until the rice is fully cooked before adding sugar. Adding it too early can toughen the rice grains.
Elevate with Garnishes
» Garnish with nuts, raisins, or edible silver leaf (varak) for an authentic Dishoom-style finish.
Chef’s Note:
Kheer thickens as it cools. You can add some milk before serving!
Serving and Garnishing Tips
» Serve in clay pots for authenticity.
» Top with almonds, pistachios & cashews.
» Add saffron strands for colour & aroma.
» Sprinkle rose petals or silver leaf for elegance.
» Enjoy warm in winter or chilled in summer.
Storage and Reheating Tips
» You can store this recipe for up to 3 days in the fridge.
» Reheat with a splash of milk to maintain consistency.
» Avoid freezing to maintain a creamy texture.
Best Ways to Pair & Serve Dishoom Basmati Kheer
» Garnish with rose petals and nuts for elegance.
» You can try it as a dessert after dinner.
» Chill and serve as a summer dessert.
» Pair with savoury Indian meals like biryani or kebabs.
Should kheer be served hot or cold?
Both! Warm for cozy nights, chilled for festive meals.
Store-Bought vs Homemade Dishoom Kheer
» Store-bought: Quick, but often too sweet and lacks authentic creaminess.
» Homemade: Fresher, customizable, and much richer in flavour. Plus, you control the sweetness and texture!
Verdict: Homemade wins—always.
Best Alternate Recipes You Must Try!
» Phirni – A creamier, ground-rice pudding with saffron & nuts.
» Coconut Kheer – A tropical twist with coconut milk & jaggery.
» Vermicelli Kheer (Seviyan) – Quick & light, made with roasted vermicelli.
Nutrition Facts (Per Serving)
♥ Calories: ~230 kcal
♥ Carbohydrates: 32g
♥ Protein: 6g
♥ Fat: 8g
♥ Saturated Fat: 4g
♥ Cholesterol: 20mg
♥ Sodium: 70mg
♥ Fibre: 1g
♥ Sugars: 20g
♥ Calcium: 180mg (about 18% DV)
♥ Iron: 2mg (about 10% DV)
Dishoom Basmati Kheer Recipe
Ingredients
Equipment
Method
- Rinse and soak basmati rice.
- Boil milk in a heavy-bottomed pan.
- Add rice, simmer until soft and creamy.
- Stir in sugar, cardamom, saffron.
- Garnish with nuts and raisins before serving.
Notes
- Stir continuously to prevent milk from sticking.
- Adjust sweetness to taste.
- For a vegan option: use almond or coconut milk and jaggery.
- Serve warm in winter or chilled in summer.
Frequently Asked Questions
What rice works best for kheer?
Fragrant basmati rice is ideal for authentic flavour. However, you can also use sona masoori or even short-grain rice for a creamier texture if basmati isn’t available.
Can I make sugar-free kheer?
Yes! Replace sugar with stevia, monk fruit, or erythritol. For a natural alternative, use jaggery or dates for sweetness while still keeping the creamy Dishoom-style taste.
Can I make this kheer vegan?
Absolutely! Replace whole milk with almond or coconut milk, skip ghee, and sweeten with jaggery or coconut sugar for a delicious vegan-friendly version of Dishoom-style basmati kheer.
How can I make kheer thicker?
Simmer longer on low heat and stir often. Adding a little condensed milk or evaporated milk also helps achieve a rich, luxurious Dishoom-style thickness.
Can I reduce the cooking time?
Yes, by using condensed milk instead of part of the whole milk, you’ll shorten cooking time while adding extra creaminess. However, slow cooking develops richer flavour, just like Dishoom’s version.
What can I use instead of saffron?
If saffron isn’t available, you can use a pinch of turmeric for colour and rose water for aroma. While not identical, it still adds a lovely flavour profile.
How do I prevent milk from burning?
Always use a heavy-bottomed pan, keep the heat low, and stir frequently. Scrape down the sides to mix thickened milk back in, which also enhances the flavour.
How long does homemade kheer last in the fridge?
Kheer stays fresh for 3–4 days when stored in an airtight container. Always reheat gently with a splash of milk to maintain the creamy consistency before serving again.
My Final Conclusion
And that’s my chef’s take on the Dishoom Basmati Kheer Recipe 2026!
» Every time I cook it, I feel like I’m bringing a piece of Dishoom into my own kitchen. The saffron, the cardamom, the richness of slow-cooked milk—it’s not just dessert, it’s nostalgia in a bowl.
» As a chef, I believe no festive table is complete without a bowl of kheer. So, whether you’re making it for a celebration, a dinner party, or just to indulge yourself—trust me, this recipe won’t disappoint.
I hope you love this homemade recipe. If you have any thoughts or suggestions, then write to me in the comment section below—I’d love to hear from you. Till then!
Happy Cooking!
Recipes You May Also Like
» Italian Chicken and Eggplant
» Yard House Maui Pineapple Chicken
» Longhorn Steakhouse Chocolate Stampede Cake
» Barefoot Contessa Baked French Toast Casserole Recipe