Introduction
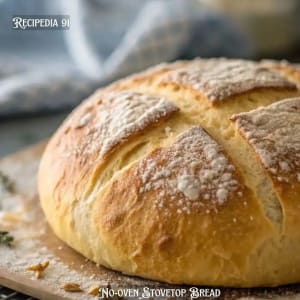
If you’ve ever wanted fresh bread but didn’t have an oven, this no-oven stovetop bread recipe 2026 is going to change your life!
» Did you know that nearly 30% of home bakers worldwide look for bread recipes without an oven? Whether it’s because of limited kitchen space, travel, or just the fun of trying something new, stovetop bread has become a lifesaver!
» As a chef, I love teaching this method to beginners—it’s fuss-free, requires basic ingredients, and the result is a soft, fluffy bread that tastes just as good as oven-baked.
In this guide. I’ll show you exactly how to make No-Oven Stovetop Bread, step by step, with tips, variations, and everything you need to know!
So, let’s get started!
What is Stovetop Bread?
» Perfect for small kitchens, camping, or energy-saving cooking.
» Produces soft, fluffy bread with a golden crust.
» A bread-making method that uses a skillet, pan, or Dutch oven instead of a traditional oven.
How to Bake on the Stovetop?
Baking on the stovetop is simple with the right setup:
» Use a heavy-bottomed pan or skillet.
» Preheat on low heat for 3–4 minutes.
» Cover with a tight lid to trap steam.
» Cook low and slow, turning if necessary for even cooking.
» Place dough or batter inside (in a greased pan or lined container if needed).
» Check doneness by tapping (hollow sound) or using a thermometer (190°F / 88°C for bread).
Why Make Stovetop Bread Without an Oven?
Not everyone has the luxury of an oven, but that shouldn’t stop you from enjoying fresh, fluffy bread. Here’s why stovetop bread is a must-try:
» Travel-friendly — great for camping or road trips.
» Energy-efficient — uses less power than an oven.
» Quick to make — no long preheating time needed.
Kitchen Equipment Required For No-Oven Stovetop Bread
♥ Cooling Rack
♥ Measuring Cups & Spoons
♥ Clean Kitchen Towel or Plastic Wrap
♥ Mixing Bowl – For combining and proofing dough.
♥ Bench Scraper or Knife – For dividing or shaping dough.
♥ Rolling Pin (Optional) – For shaping flat or even dough.
♥ Tight-Fitting Lid – Traps steam for soft, evenly cooked bread.
♥ Wooden Spoon or Spatula – For mixing dough before kneading.
♥ Floured Surface or Pastry Mat – For kneading dough without sticking.
♥ Kitchen Thermometer (Optional) – To check doneness (190°F / 88°C).
♥ Heavy-Bottomed Skillet or Cast Iron Pan – Ensures even heat and prevents burning.
Ingredients For No-Oven Stovetop Bread Recipe 2026
Here’s your simple bread-making toolkit:
Basic Ingredients
♥ 2 cups all-purpose flour (or bread flour)
♥ 1 tsp instant yeast
♥ 1 tbsp sugar
♥ 1 tsp salt
♥ ¾ cup warm water (or milk for richer flavor)
♥ 1 tbsp olive oil or melted butter
Optional Add-ins
♥ Fresh herbs like rosemary or thyme
♥ Garlic powder for savory flavor
♥ Sesame seeds or poppy seeds for topping
Substitutions
♥ Gluten-free flour blend for a GF option
♥ Dairy-free milk for vegan bread
♥ Whole wheat flour for a heartier loaf
Recipes You May Also Like!
» Pepper Belly Pete Chili Recipe
How to Make No-Oven Stovetop Bread Step-by-Step 2026

» This method will give you soft, golden no-oven stovetop bread with the perfect balance of a tender crumb and a slightly crisp crust.
Here’s how I do it in my kitchen.
Will stovetop bread taste the same as oven-baked bread?
Stovetop bread is slightly different — it’s softer, denser, and less crusty than oven-baked loaves. However, the flavor is still rich and satisfying, especially when fresh and warm. Some even prefer its soft texture.
Step 1. Activate the Yeast
» Measure the liquid: Take a medium-sized bowl & add ¾ cup of lukewarm water (milk to add a richer taste). not hot, so it doesn’t kill the yeast.
» Add yeast & sugar: Now you need to add and stir 1 tsp yeast & 1 tbsp sugar. The sugar feeds the yeast, helping it to bubble and activate faster.
» Wait for proof: Let it sit for 5–7 minutes. You’ll notice a foamy, bubbly layer forming on the surface — this means your yeast is alive and ready. If nothing happens, your yeast may have expired, and it’s best to start over.
Step 2. Make the Dough
» Add dry ingredients: To the yeast mixture, add 2 cups of all-purpose flour and 1 tsp salt. Salt enhances flavor, but never mix it directly with yeast before adding liquid — it can slow fermentation.
» Add fat: Pour in 1 tbsp olive oil (or melted butter for extra richness).
» Mix: Use a wooden spoon or spatula to combine until it forms a rough, shaggy dough.
Step 3. Knead for Softness
» Knead: Now, place the dough on a lightly floured surface and knead the dough perfectly for 8–10 minutes.
» Check for gluten development: Your dough should be smooth, elastic, and slightly tacky but not sticky.
Chef’s tip:
If the dough feels too sticky, sprinkle a little flour at a time — adding too much at once can make the bread dry.
Step 4. First Proofing
» Prepare the bowl: Lightly oil a clean bowl and place the dough inside, turning it to coat so it doesn’t stick.
» Cover & rise: Now, with the help of a damp kitchen towel or plastic wrap, cover the bowl perfectly.
» Time: Now let the dough rise for at least 45–60 minutes. Keep it in a warm, draft-free spot. In colder environments, you can place it inside a turned-off oven with the light on.
Step 5. Shape the Dough
» Deflate gently: Punch the dough down lightly to release excess gas.
» Shape: Now, depending on your skill, form a round or oval-shaped loaf. Keep the surface smooth by tucking the dough under itself.
Step 6. Cook on the Stovetop
» Preheat the skillet: Place a heavy-bottomed skillet or cast-iron pan over low heat for 3–4 minutes. Low heat is key to cooking the bread evenly without burning the crust.
» Transfer the dough: Now you can transfer the dough gently to the skillet.
» Cover: Use a tight-fitting lid to trap steam, which mimics an oven’s enclosed heat and keeps the bread moist.
» Cook the first side: Let it cook 12–15 minutes without lifting the lid too often (this keeps heat inside).
» Flip: Carefully turn the bread using a spatula or tongs.
» Cook the second side: Now, you need to cook the second side until you get a golden brownish tone for at least 10–12 minutes
» Check the Dough: Now tap the bread lightly & check, it should feel hollow. An internal temperature of 190°F (88°C) means it’s fully cooked.
Can I cook stovetop bread on high heat to save time?
No, high heat will burn the outside while leaving the inside undercooked. Always cook over low or medium-low heat, allowing the bread to cook through evenly and develop a golden-brown crust.
Step 7. Cool, Serve & Enjoy!
» Rest: Now you can place the bread on a wire rack & let it cool for at least 10 minutes to keep it soft & easy to slice.
» Serve: Slice and enjoy with butter, spreads, or alongside soups and stews.
Ingredient Substitutes for No-Oven Stovetop Bread
| Ingredient | Substitute Option | Notes |
|---|---|---|
| All-purpose flour | Bread flour / Whole wheat flour | Bread flour = chewier texture; whole wheat = denser but healthier. |
| Instant yeast | Active dry yeast / Baking powder (quick bread) | Use baking powder if you want a no-yeast version. |
| Sugar | Honey / Maple syrup / Coconut sugar | Adds mild sweetness and helps yeast activation. |
| Olive oil | Butter / Vegetable oil / Coconut oil | Butter = richer flavor; coconut oil adds a light sweetness. |
| Warm water | Warm milk / Dairy-free milk (almond, oat) | Milk makes the bread softer; plant-based milk keeps it vegan. |
| Salt | Sea salt / Himalayan pink salt | Adds flavor; adjust amount to taste. |
Chef’s Tip:
If you’re using whole wheat flour, add 1–2 extra tablespoons of warm water to keep the dough soft and pliable.
Tips for Perfect No-Oven Stovetop Bread Recipe
» Keep the heat low to avoid burning.
» Use a thick-bottomed pan — prevents burning.
» Cover with a lid — traps steam for soft bread.
» Rest before slicing — keeps texture fluffy.
» Cook low and slow — ensures the inside cooks through.
» Brush bread with butter after cooking for a softer crust.
» Add herbs, garlic, or cheese for extra flavor.
Flavor Variations & Creative Twists
» Garlic Herb — Mix in 1 tbsp chopped herbs + ½ tsp garlic powder.
» Cinnamon Sugar — Sprinkle cinnamon sugar before cooking.
» Cheese-Stuffed — Wrap dough around cheese cubes before cooking.
» Multigrain — Replace part of the flour with oats, flaxseed, or rye flour.
Storage and Reheating Tips
- You can store it in an air-tight container for up to 2 days.
- Freeze for up to 2 months — wrap in foil or a freezer bag.
- Reheat in a skillet for 3–4 minutes or in the microwave for 20 seconds.
Serving Ideas & Pairing With No-Oven Stovetop Bread
» Freshly made no-oven stovetop bread is incredibly versatile. Its soft, fluffy texture and mild flavor make it the perfect companion for countless dishes, from hearty dinners to sweet breakfasts.
» Breakfast: Butter, cream, cheese, honey, avocado spread.
» Soups & Stews: Tomato basil soup, lentil stew, creamy chowder.
» Party Platters: Cheese board, dips & spreads, tapas-style toppings.
» Dinner Sides: Garlic bread with pasta, curry companion, and BBQ side.
» Sweet Treats: Cinnamon sugar bread, Nutella & banana, berries & whipped cream.
» Sandwiches & Wraps: Grilled cheese, Mediterranean veggie wrap, chicken salad sandwich.
Common Mistakes in No-Oven Stovetop Bread Recipe
Here are some Common Mistakes to Avoid for your No-Oven Stovetop Bread Recipe!
» Cooking on high heat – To avoid burning the crust, I suggest cooking on low or medium flame.
» Skipping proofing – Without proper rising time, the bread will be dense and heavy.
» Not activating yeast properly – If the yeast isn’t foamy after activation, it’s likely dead. Start over with fresh yeast.
» Using a thin-bottomed pan – A heavy-bottomed skillet or cast-iron pan is best.
» Lifting the lid too often – Releasing steam frequently leads to a dry loaf. Keep the lid closed as much as possible.
» Adding too much flour – Over-flouring makes bread dry. The dough should be slightly tacky, not stiff.
» Overcrowding the pan – Cooking multiple loaves in a small pan prevents even browning and can undercook the center.
» Skipping the cooling step – Cutting bread too soon lets steam escape, making it gummy. Rest for at least 10 minutes before slicing.
Best Alternate Recipes You Can Try Today!
» If you enjoyed this No-Oven Stovetop Bread Recipe, here are some more homemade bread and comforting recipes you’ll love:
» Garlic Butter Naan – Soft and fluffy Indian flatbread made on a skillet.
» Homemade Tortillas – Perfect for tacos, wraps, and quesadillas.
» Fluffy Pancakes Without Oven – A quick breakfast favorite.
» Skillet Focaccia Bread – Crispy on the outside, soft inside, infused with herbs.
» Crockpot Creamy Potato Hamburger Soup – Cozy and hearty pairing with fresh bread.
» Marry Me Chicken Pasta Recipe – Creamy, cheesy pasta that goes perfectly with stovetop bread.
» Creamy Chicken and Rice Soup – Another comfort-food combo for bread dipping.
» Wegmans Garlic Tuscan Bread Recipe
» Brenda Gantt Cornbread Recipe
» Mamma Cozy Pizza Dough Recipe
» Fluffy Cottage Cheeze Cloud Bread Recipe
Chef’s Tip:
Fresh stovetop bread pairs beautifully with soups, pasta, and even breakfast spreads. Try mixing and matching these recipes for complete, satisfying meals!
Nutrition Facts (Per Slice – Approximate)
♥ Calories: 160 kcal
♥ Carbs: 32 g
♥ Protein: 5 g
♥ Fat: 2 g
♥ Fiber: 1 g
No-Oven Stovetop Bread Recipe Card
Ingredients
Equipment
Method
- Activate yeast: In a mediumsized bowl combine the following: warm water, sugar, and yeast for at least for 5–7 minutes until you get foamy texture.
- Make dough: Add flour, salt, and oil; mix to form a shaggy dough.
- Knead: Knead the dough perfectly for at atleast 8–10 minutes until you get soft dough.
- First proof: Now, you can place in an oiled bowl & cover the dough & let rise for at least 45–60 minutes.
- Shape: Punch down dough, shape into a round loaf.
- Preheat skillet: Heat a heavy pan on low heat for 3–4 minutes.
- Cook: Now, you can place the loaf gently on the skillet, cover, and cook for at least for12–15 minutes until you golden brown texture on bothe the sides.
- Cool: Transfer to a wire rack, rest 10 minutes before slicing.
Notes
- Use low heat to avoid burning while ensuring the bread cooks through.
- For extra flavor, mix herbs or cheese into the dough.
- You can store it in an air-tight container for up to 2 days.
- A cast-iron pan gives the best crust and even cooking.
Frequently Asked Questions
Why is my stovetop bread dense?
Dense bread is often due to under-proofing or using yeast that hasn’t been activated properly. Ensure your yeast is fresh, give the dough enough rising time, and knead well to develop gluten for a lighter texture.
Can I add fillings to stovetop bread?
Definitely! You can stuff bread with cheese, garlic butter, caramelized onions, or even sweet fillings like cinnamon sugar.
How can I make stovetop bread fluffier?
Use warm liquid for yeast activation, knead the dough thoroughly, and allow enough proofing time. Adding a little milk instead of water can also improve softness and give a tender, fluffy crumb.
How long does stovetop bread take to cook?
Cooking time is typically 20–25 minutes total — about 12–15 minutes per side over low heat. Times can vary based on dough thickness, stove temperature, and pan type. Always check doneness before removing.
How do I know when stovetop bread is done?
Tap the bread’s bottom — it should sound hollow. You can also use a kitchen thermometer; the internal temperature should reach around 190°F (88°C) for a fully cooked, soft interior.
How do I store stovetop bread to keep it fresh?
Store cooled bread in an airtight container at room temperature for up to 2 days. For longer storage, wrap tightly in foil or a freezer bag and freeze for up to 2 months.
Can I make stovetop bread without oil or butter?
Yes. You can skip oil or butter, but the bread may be slightly less tender. For a healthier alternative, use olive oil spray or unsweetened applesauce to add moisture without excess fat.
My Final Thoughts
And there you have it — warm, soft, no-oven stovetop bread recipe 2026 made in your kitchen, no oven required! From my kitchen to yours, this no-oven stovetop bread breakfast recipe proves you don’t need fancy equipment to enjoy fresh, soft bread.
» As a chef, I love this method because it proves you don’t need fancy equipment to enjoy homemade bread. It’s budget-friendly, quick, and endlessly customizable. So go ahead, give it a try, and impress your family with fresh bread today!
» So go ahead — grab your skillet, mix up some dough, and make your kitchen smell like a bakery. Trust me, once you try this method, you’ll be baking bread anywhere, anytime.
I hope you like this recipe. If you have any thoughts or suggestions, then share them with me in the comment section below! – I’d love to hear from you. Till then.
Happy Cooking!
Recipes You May Also Like
» Brach’s Maple Nut Goodies Recipe
» Longhorn Steakhouse Chocolate Stampede Cake
» Barefoot Contessa Baked French Toast Casserole